storyboarding
3 Key Things You Need in a Storyboard:
-sketch of the shot
-labelled shot
-description of what's happening in the shot/scene
The sketch of the shot is to show to the audience what we plan on the shot looking like - this gives them a vague idea of the story and what is happening. Labelling the shots allows the audience to see which one is going to first etc, so there is a clear order and it allows it to be in enough detail so that someone else would be able to replicate the media. By using the right terminology such as long shot, close up, high angle and pan movement it gives the audience a clear and detailed understanding and allows them to understand the language. It also test us to see if we know what the correct shots are. By writing a description of what's happening in the shot it allows the audience to get a better understanding as they may not get what is in the drawing. It also allows us to give a detailed explanation of whats coming and going after it to indicate to us what to do next. It also leads onto the next shot so it makes sense - as a drawing is only one shot of a still image and in a storyboard you are unable to complete every shot in a storyboard as it would be too much.
If we don't follow these three simple steps, we will end up with a terrible storyboard as it will either contain no sketch (pictures), no shots or the readers will not understand it. If we use all the following steps, the readers will be able to follow the story and have a wide understanding of what's going on.
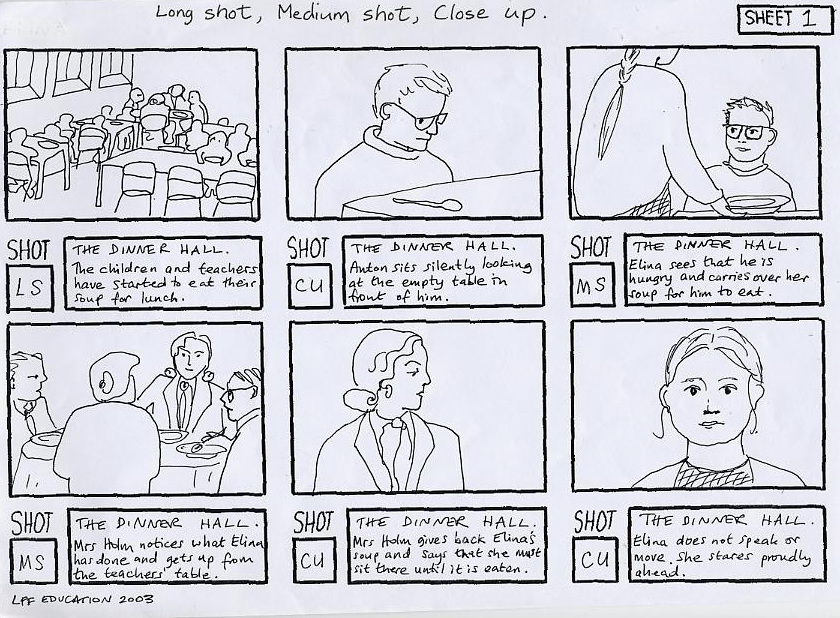
Here is a great example of a storyboard:
-sketch of the shot
-labelled shot
-description of what's happening in the shot/scene
The sketch of the shot is to show to the audience what we plan on the shot looking like - this gives them a vague idea of the story and what is happening. Labelling the shots allows the audience to see which one is going to first etc, so there is a clear order and it allows it to be in enough detail so that someone else would be able to replicate the media. By using the right terminology such as long shot, close up, high angle and pan movement it gives the audience a clear and detailed understanding and allows them to understand the language. It also test us to see if we know what the correct shots are. By writing a description of what's happening in the shot it allows the audience to get a better understanding as they may not get what is in the drawing. It also allows us to give a detailed explanation of whats coming and going after it to indicate to us what to do next. It also leads onto the next shot so it makes sense - as a drawing is only one shot of a still image and in a storyboard you are unable to complete every shot in a storyboard as it would be too much.
If we don't follow these three simple steps, we will end up with a terrible storyboard as it will either contain no sketch (pictures), no shots or the readers will not understand it. If we use all the following steps, the readers will be able to follow the story and have a wide understanding of what's going on.
Here is a great example of a storyboard: